Deploy Azure Functions App
I always prefer to set up hosting environments and build/deploy pipelines right after creating a new project. In my experience doing this right after project creation, adds the following advantages
- It’s almost always easier to set up CI/CD while the project is simple and expand as needed when project needs evolve.
- It ensures we will be able to deploy and host the application in the form we’re building it in, no last minute surprises.
- It saves time during development if there’s a shared environment, where devs can deploy and test code in production(like) environment.
- It provides a shared environment where the team can demonstrate progress to outside stakeholders.
It’s possible to deploy your Azure function directly from your local dev-machine using the Azure cli or VS Code (which probably uses the Azure cli underneath), but if you’re working on this project from various machines or together with other developers, deploying from your local machine won’t cut it. We need an automated workflow triggered by code pushes, aka a CI/CD pipeline.
There’s a lot of possibilities for building CI/CD these days, TeamCity, Octopus, Bamboo, Azure Pipelines and Github actions, to name a few. My favorite for the time being is Azure Pipelines, which is what the example in this post are using.
CI / CD strategy
CI/CD can be done in a myriad of ways, and in my opinion the only right way is the way that suits the team working on the project, and the business needs of the project owner. The most important aspect of a CI/CD pipeline is that it is well understood by the team working on the project, so that they are able to predict what is going to happen in the pipeline when they are working, and they know what to do to achieve a certain effect. At the same time the pipeline should of course enforce and support rules/decisions coming from the business side - like the ability to support release windows, or the ability to support external approvals before going into production etc.
Let’s set up a CI/CD to support the following needs:
- We need to have a shared development environment that runs the a branch of the code that is a candidate to go into production.
- We need to have a QA environment where we can do acceptance testing of a release candidate version of the code.
- We need to have a Production environment that is protected from accidental commits
- We need to be able to roll out hotfixes without disturbing the flow in the development/QA environments.
- We need to support timed and approved releases into the QA and production environments, while keeping the ability of the team to merge, build and do automated tests of the code before the release into QA and prod.
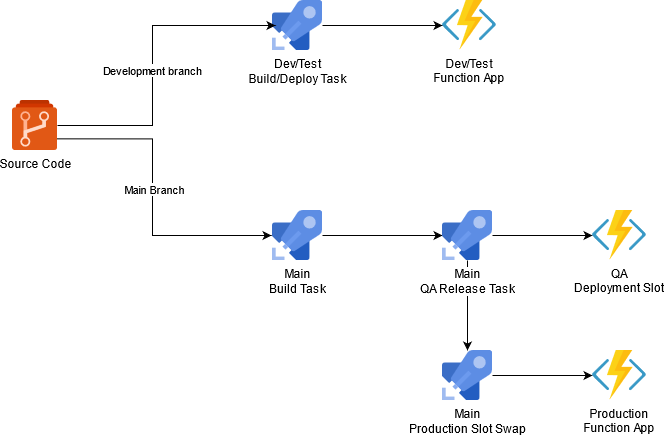
One way to achieve this, is the set up branches, hosting environments and Pipeline configurations like this:
- Development environment is tied to the development branch of the code base. Every commit pushed to the central repos development branch will go through the entire pipeline without any gates, other than passing automated tests.
- QA environment is tied to the main branch of the code base. Whenever a commit is pushed to the main branch the pipeline builds the code, creates the deploy artifacts, and sets up a deploy ready to execute in Azure Pipelines. This deploy will deploy the artifacts to a QA deployment slot on the production Function App. We will assign rights and responsibility to one or more team-members to approve the deploy in Azure Pipelines.
- We will tie the production environment to the main branch as well and deploy to production by swapping the QA slot into production. We will assign rights and responsibility to approve this to one or more team members.
- Hotfixes are done in a separate CI/CD pipeline, when we need to do a hotfix we create a hotfix branch based on the latest commit deployed to production, and deploy directly into the production environment from that. We will assign rights and responsibilities to approve deploys on this pipeline as well to make sure only certain team-members will be able to push into production using hotfixes.
Create Function apps
So we need two Function Apps, one for development and one for production, and a qa deployment slot attached to the production app. Function Apps comes in three different service plan flavors - service plans being the “container” that defines compute resources available to the Functions in the app:
- Consumption (Serverless) plan
- This is the classic Functions hosting plan, where there’s no dedicated resources the functions will spin up when needed, and scale out if necessary, this is also the cheapest plan
- Premium plan
- A lot like the consumption plan, but this plan makes sure at least one of each of the project functions are kept warm all the time, thus avoiding slow replys on first requests, when function has been spun down.
- Dedicated plan (App Service Plan)
- This plan hosts the functions in an App Service plan, much like a Web App plan, which means you need to select a service plan level, and make sure you allocated enough resources, this plan doesn’t auto scale.
In our setup we might consider using a serverless Service Plan for the development environment since it doesn’t incur costs while not being used, and a Premium plan for the production environment to ensure at least one instance of each function is always running and ready. I would only consider Dedicated Plans, if you’re sure you can fit the load into an existing App Service Plan running other resources like a website.
As with anything else in Azure there are multiple ways of provisioning a Function App like the portal, ARM templates, the Azure CLI or my current favorite Azure Powershell. I created an powershell script that would set up the needed resources, which are:
- A resource group to hold the resources
- A storage account to be used by all the function apps - Function Apps relies on storage accounts for storing state and function definitions
- A Premium App Service Plan to hold the Production Function App
- The dev/test Function app
- The production Function App
Here’s the script - if you want to try it out, just copy the contents, save it to a .ps1 file, change appname and saname values and run it from Azure Powershell while logged in to an account.
$appname = 'myapp'
$rgname = "rg-$appname"
$prodsvcplanname = "afp-$appname-prod-001"
# Storage account names needs to be globally unique and below 24 chars
$saname = "samyapp09fec56d01cd"
$location = 'West Europe'

# Create resource group
New-AzResourceGroup -Name $rgname -Location $location

# Storageaccount to store state
New-AzStorageAccount -ResourceGroupName $rgname `
    -AccountName $saName `
    -Location $location `
    -SkuName Standard_LRS `
    -AccessTier Hot

# Premium App Service Plan for the production app
New-AzFunctionAppPlan -ResourceGroupName $rgnanme `
    -Name $prodsvcplanname `
    -Location $location `
    -MinimumWorkerCount 1 `
    -MaximumWorkerCount 10 `
    -Sku EP1 `
    -WorkerType Windows

# Function App for Production
New-AzFunctionApp -ResourceGroupName $rgname `
    -Name "afp-$appname-prod-001" `
    -Location $location `
    -StorageAccountName $saName `
    -PlanName $prodsvcplanname
    -OSType Windows `
    -Runtime DotNet `
    -RuntimeVersion 3 `
    -FunctionsVersion 3

# The dev/test function app
# Since I don't supply a Plan Name it will create
# a serverless consumption plan for me
New-AzFunctionApp -ResourceGroupName $rgname `
    -Name "afa-$appname-dev-001" `
    -Location $location `
    -StorageAccountName $saName `
    -OSType Windows `
    -Runtime DotNet `
    -RuntimeVersion 3 `
    -FunctionsVersion 3
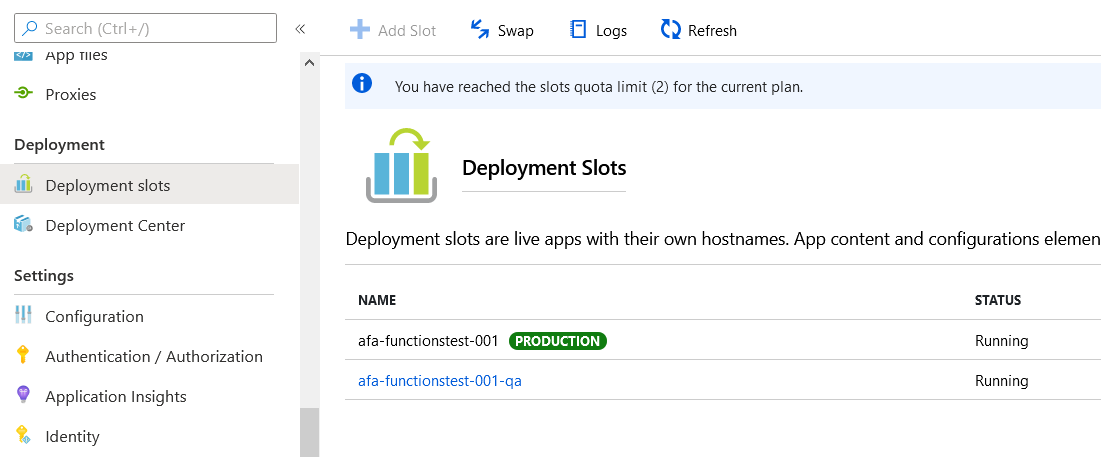
I couldn’t find a way to add a deployment slot to a function app using Azure Powershell, it’s probably entirely possible if you use ARM Template deployments, but I find ARM templates cumbersome to work with, and would only consider those for projects where infrastructure as code is a priority, here I resorted to do it using the Azure portal:
So now we have a functions app in the cloud, next thing is to set up the pipeline to deploy to it. To do that we need to have the functions app code in a git repository accessible for Azure Pipelines, end we need to set up a service connection in Azure Pipelines that will let you deploy to your azure subscription. To keep this post a bit shorter, I will not go over how to do that here.
Build setup
Setting up a build pipeline for a function app is very much like setting up a pipeline for a web app. The easiest way to get started is to let Azure Pipelines create the pipeline for you, then adapt the created pipeline if you need to.
Go to Azure Devops Pipelines section and click the “New Pipeline” button in the upper right corner. This will take you through a short wizard, asking first for the location of your code, which should be in a git repo Azure Devops has access to, then after analyzing the content of the repo, it should propose to create “.NET Core Function App to Windows on Azure” pipeline. Selecting that option will pop up a sidebar where you can select which subscription/service connection you want to use, and which function app (and slot) you would like to deploy to, then generate this yml config file
After generating this script in Azure Pipelines, you can choose to save it from inside the Azure Devops interface, when you do that it will be added to the master branch in your git repository as /azure-pipelines.yml. But since we need more than one pipeline I prefer to add the yml files to the repo myself and the create the pipelines in Azure Devops after that.
I’ll add three pipeline files: One for the dev/test deploys, one for qa/production deploys and one for hotfix deploys.
Dev / Test deploy pipeline
Since I don’t need to be able to do approval flows when deploying to development I’ll use a single pipeline task that builds and deploys to development environment in one go. There’s no need to log into Azure Devops and approve this every time we push to development, and approval can be handled using pull request with code review if necessary
Create a file called azure-pipelines-dev.yml somewhere in the repo, maybe in a /build folder and insert the following
# Trigger this pipeline on push to development branch
trigger:
- development

variables:
  # Azure subscription id from the
  azureSubscription: 'name-of-service-connection'

  # Function app name from the creation script
  functionAppName: 'afa-functionstest-dev-001'

  # Working Directory
  workingDirectory: '$(System.DefaultWorkingDirectory)/'

# Agent pool
pool: 'Pool name'
# Could also be an image name from the built-in agents
# pool:
#   vmImage: 'vs2017-win2016'

stages:
# Build stage handling building the code
- stage: Build
  displayName: Build stage

  jobs:
  - job: Build
    displayName: Build

    steps:
    - task: DotNetCoreCLI@2
      displayName: Build
      inputs:
        command: 'build'
        projects: |
          $(workingDirectory)/*.csproj
        arguments: --output $(System.DefaultWorkingDirectory)/publish_output --configuration Debug
    # Will execute
    # dotnet build --output $(System.DefaultWorkingDirectory)/publish_output --configuration Debug
    # and put the result in a publish_output folder in the working directory

    - task: ArchiveFiles@2
      displayName: 'Archive files'
      inputs:
        rootFolderOrFile: '$(System.DefaultWorkingDirectory)/publish_output'
        includeRootFolder: false
        archiveType: zip
        archiveFile: $(Build.ArtifactStagingDirectory)/$(Build.BuildId).zip
        replaceExistingArchive: true
    # This will zip the files in the publish_output folder and place them in
    # $(Build.ArtifactStagingDirectory)/$(Build.BuildId).zip
    # File will be named with a number representing the BuildId

    - publish: $(Build.ArtifactStagingDirectory)/$(Build.BuildId).zip
      artifact: drop
    # This publishes the zip file so it's availabe outside this stage
    # in folder called 'drop'

- stage: Deploy
# Deploy stage - this stage deploys the function app directly to development environment
  displayName: Deploy stage
  dependsOn: Build
  condition: succeeded() # only runs if previous succeeded

  jobs:
  - deployment: Deploy
    displayName: Deploy
    environment: 'development' # this will tag the deploy, and make it viewable in the "Environments section"

    strategy:
      runOnce:
        deploy:
          # deployment step does the actual deployment
          steps:
          - task: AzureFunctionApp@1
            displayName: 'Azure functions app deploy'
            inputs:
              azureSubscription: '$(azureSubscription)'
              appType: functionApp
              appName: $(functionAppName)
              package: '$(Pipeline.Workspace)/drop/$(Build.BuildId).zip'
When this is added into the development branch, and pushed to the central repo, you can go into Azure devops and hook up this pipeline.
Go to the ‘Pipelines’ sectionn in the project in Azure devops, and click the ‘New Pipeline’ in the upper right corner. Azure Devops will prompt you for a repository, and then give you these options:
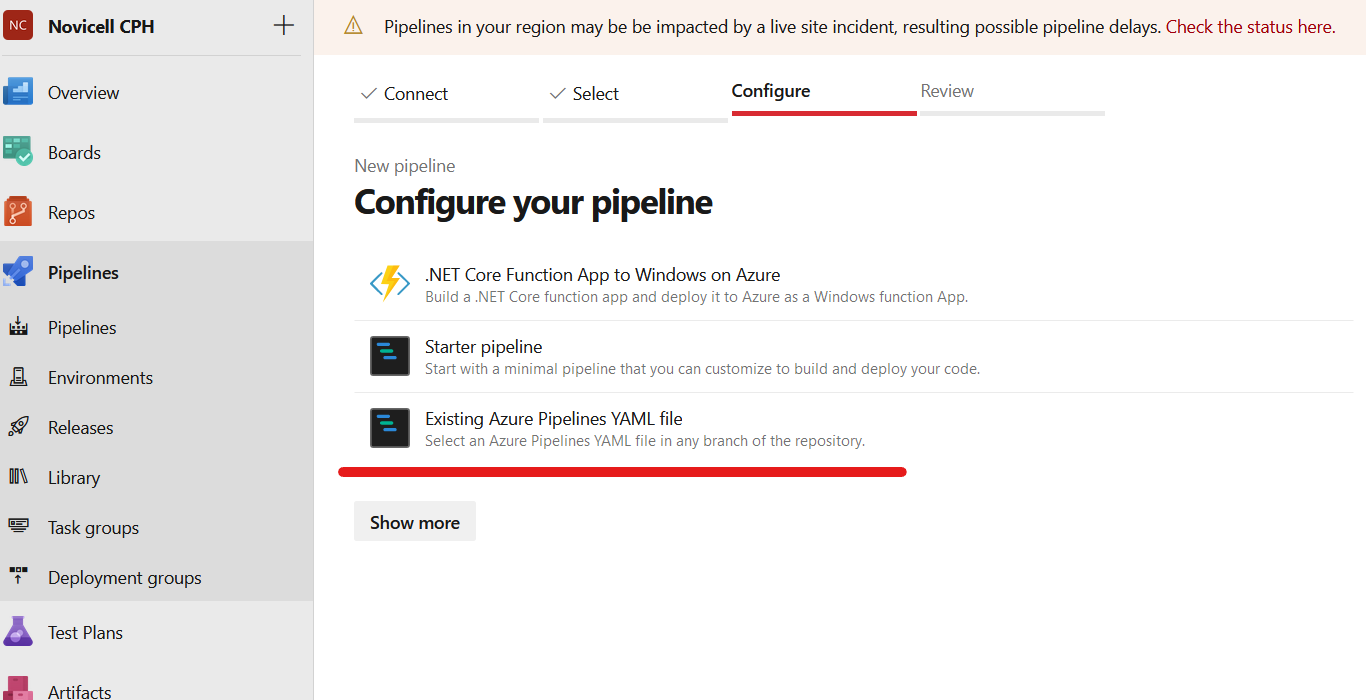
Select the underlined option in the screen shot ‘Existing Azure Pipelines YAML file’, and it will let you select your yml file from the repo. Go through the wizard and name it “Dev deploy” (or something else).
Production deploy pipeline
Since we want to be able to use approved and timed deploys for the QA/Production environment we need to split up the production pipeline in a build task and a release task. Build task first
Create a file called azure-pipelines-prod.yml same place as the dev file and insert the following:
trigger:
- master

variables:
  # Working Directory
  workingDirectory: '$(System.DefaultWorkingDirectory)/'

# Agent pool
pool: 'Pool name'

stages:
- stage: Build
  displayName: Build stage

  jobs:
  - job: Build
    displayName: Build

    steps:
    - task: DotNetCoreCLI@2
      displayName: Build
      inputs:
        command: 'build'
        projects: |
          $(workingDirectory)/*.csproj
        arguments: --output $(System.DefaultWorkingDirectory)/publish_output --configuration Release

    - task: ArchiveFiles@2
      displayName: 'Archive files'
      inputs:
        rootFolderOrFile: '$(System.DefaultWorkingDirectory)/publish_output'
        includeRootFolder: false
        archiveType: zip
        archiveFile: $(Build.ArtifactStagingDirectory)/$(Build.BuildId).zip
        replaceExistingArchive: true

    - publish: $(Build.ArtifactStagingDirectory)/$(Build.BuildId).zip
      artifact: drop
Basically the same as the development pipeline without the deploy step, and with build configuration ‘Release’. In the examples below I’ve used the name “QA Deploy” for this pipeline - a more fitting name would be “Prod build” - but I didn’t want to recreate all screenshots.
When this is created you should commit and push the file to the master branch and then try to run the pipeline - assuming no errors occurs, you now have what’s necessary for setting up the releases.
Releases
The purpose of releases is to have separate processes that handles the tasks of pushing the deploy artifacts to the environment where it’s supposed to run. The benefits of having a separate process is it has a UI that enables us to do things like setting up approval gates to be handled by non-developers if necessary.
Unfortunately approved releases cannot be created in .yml-files, unless you deploy to named environments and use the environment section, and the environment sections support for ordinary ARM based Azure environments is sketchy at the moment. We’ll use the Releases section instead.
The goal is to produce a release pipeline that picks up when the artifacts in the production build has been produced, and creates a deploy to QA task to be approved by a person using the Azure Pipelines UI. When the QA deployment has finished, another task will be created that will swap the QA slot for the production slot, to put the code running in QA into production. This task needs to be approved in the UI as well. When we’re finished we will have a setup that look like this in the UI:
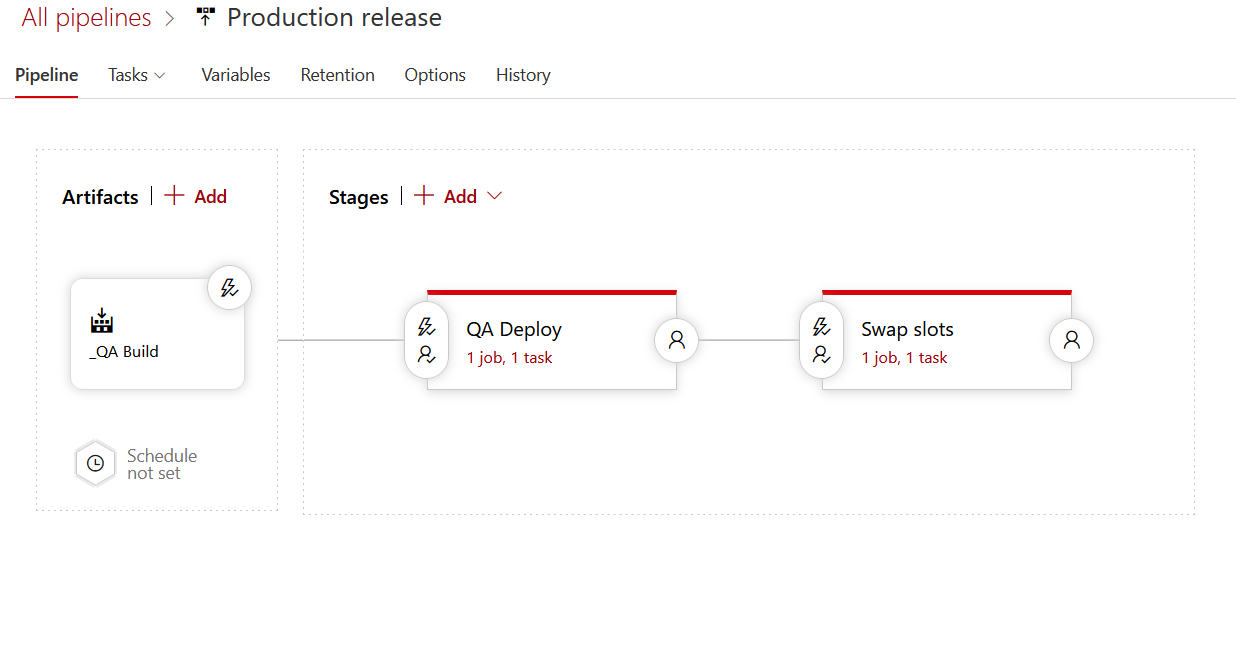
Where:
- The “_QA Build” artifact creation is triggered when the build pipeline publishes a new artifact
- The “QA Deploy” stage is triggered when the artifact is published, it needs approval by a user assigned for the approval flow, this stage contains a single task that will deploy the artifact to the QA slot in the production Function App.
- The “Swap slots” stage is triggered whenever the QA Deploy has been approved and carried out, it needs approval by a user assigned for the approval flow, and it contains a single task that carries out swapping the QA and production slots in the Azure Function App.
Once we’re done we will have a setup that supports the rules outlined in the beginning, and a nice overview of our release history looking something like this:
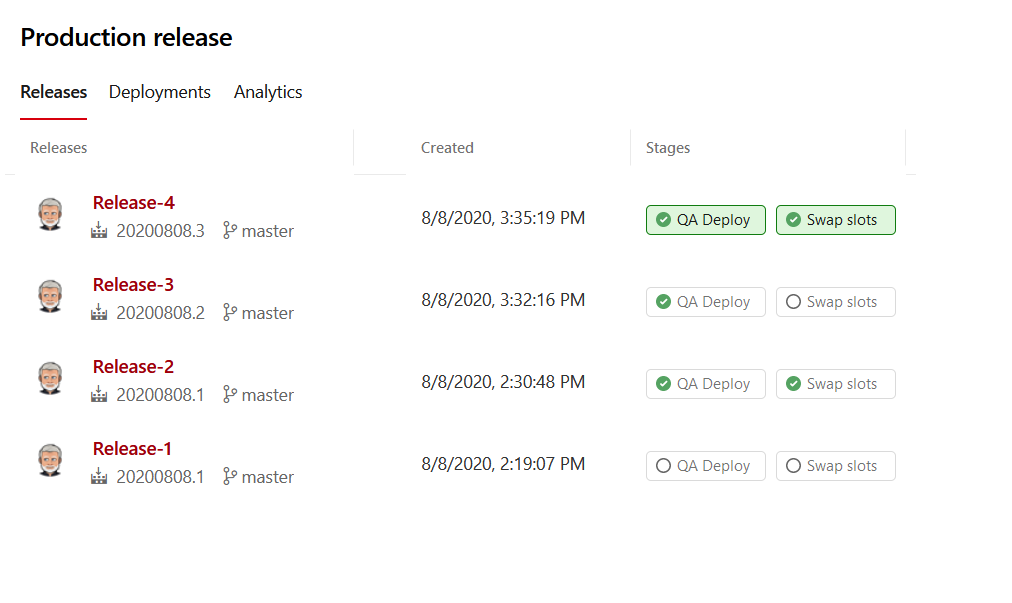
Instantly showing you the what stages has been carried out a what times by whom.
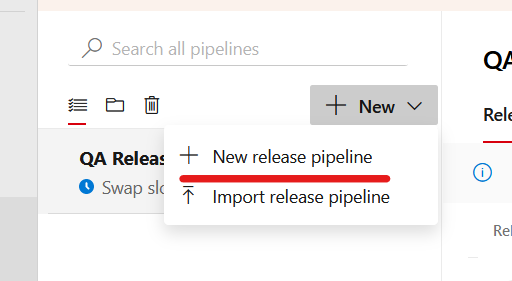
To create this release pipeline go into the Releases section and click the ‘New’ button. If you don’t have any releases in the project you can’t miss it else it will look like this:
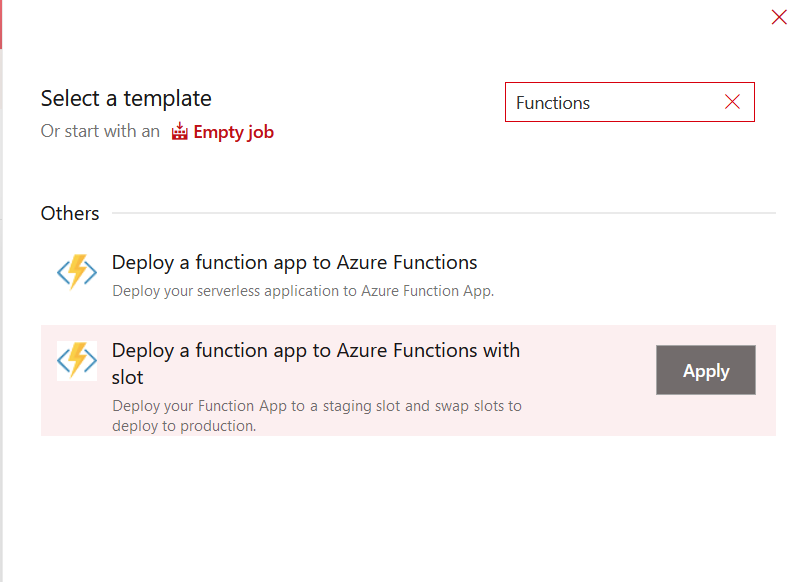
Select the ‘Deploy a function app to Azure Functions with slot’ template to start with since we want to have this release handling both QA release and production release, we start with the release to the QA deployment slot.
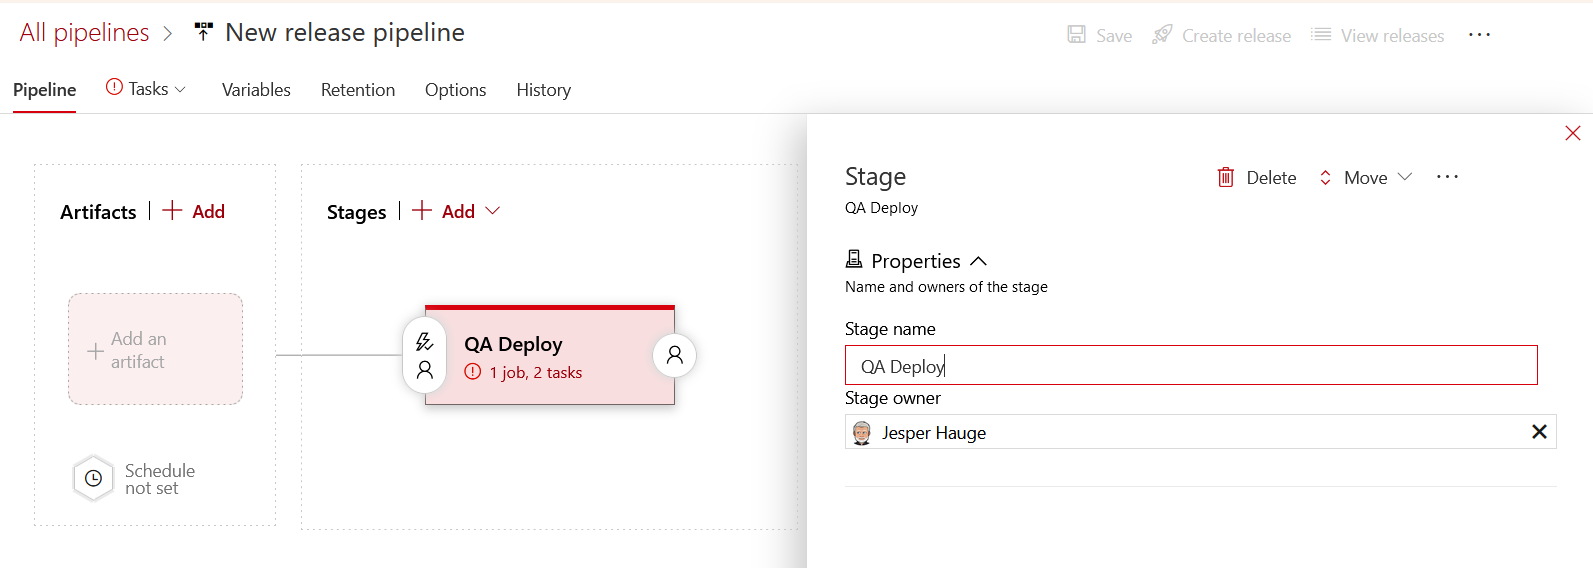
First task is to name the stage - let’s name it ‘QA Deploy’
Next task is to configure the release tasks, click the Tasks tab with the exclamation mark, and configure the tasks with the necessary data for connecting to Azure
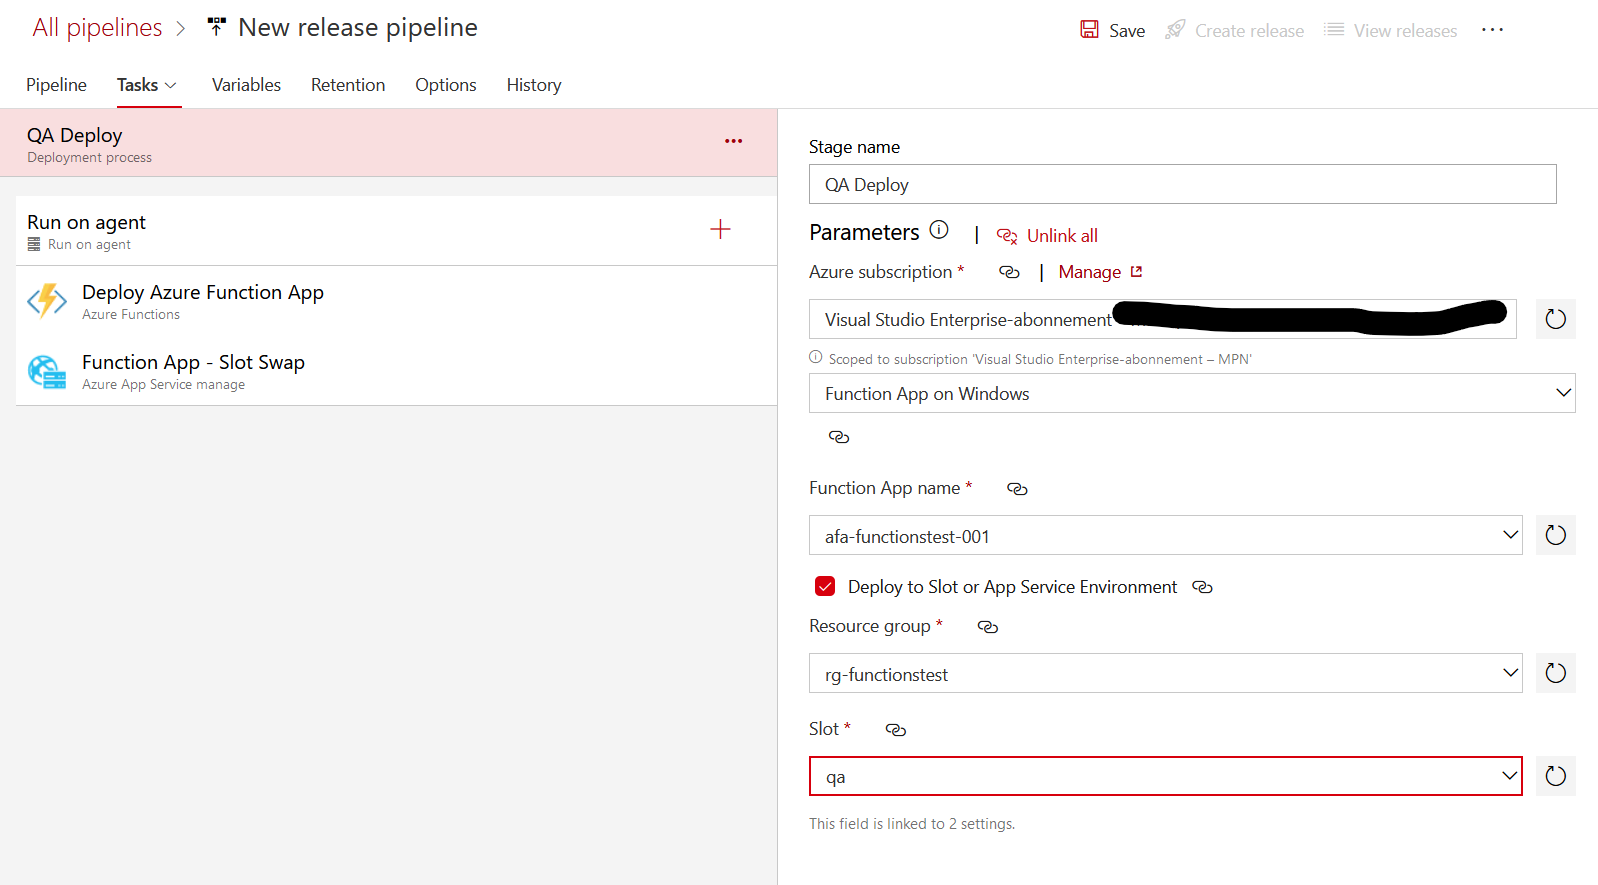
You need to select
- The Service connection you’re using
- The type of resource you want to deploy to (Function App on Windows)
- The function app
- The resource group
- The slot
Which means all these things need to be in place before you can set up the deployment task.
Next we want to delete the “Slot Swap” task from the task list to the left - it doesn’t makes sense to swap the QA and production slots straight away since we’re deploying to the QA slot, and need to do QA before going into production.
Click the “Function App - Slot Swap” task in the list and click “Remove” in the upper right corner.
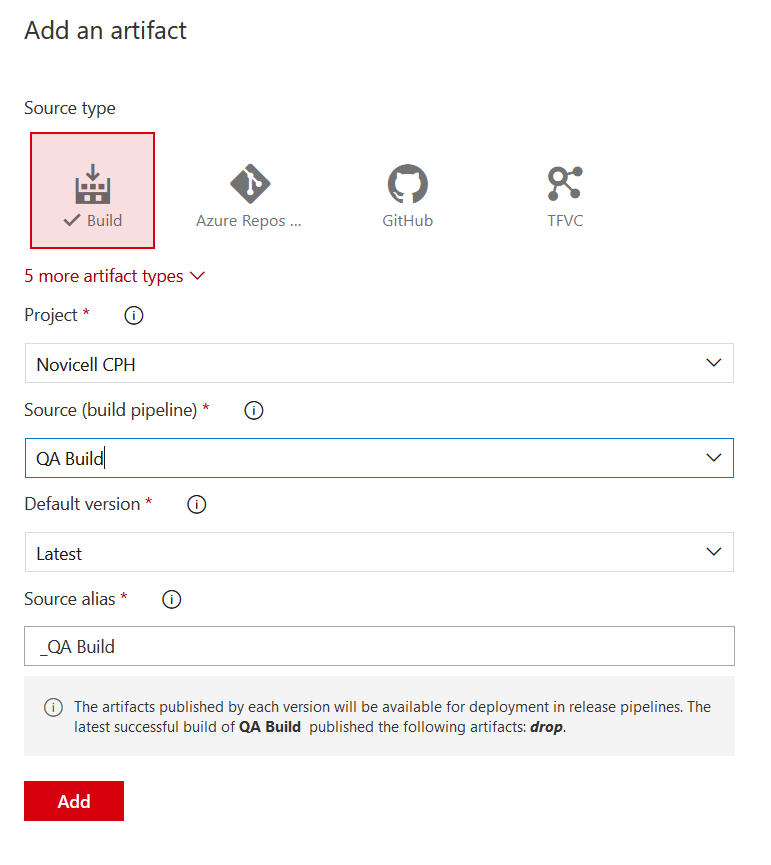
Next up is adding the artifacts to use - click the “Pipeline” tab, and the box with the text “Add an artifact”, then select the build pipeline producing the artifacts from the main branch (In this screenshot its called “QA Build”).
Next is adding a continuous deployment trigger to the artifact. Click the lightning icon on the artifacts box:
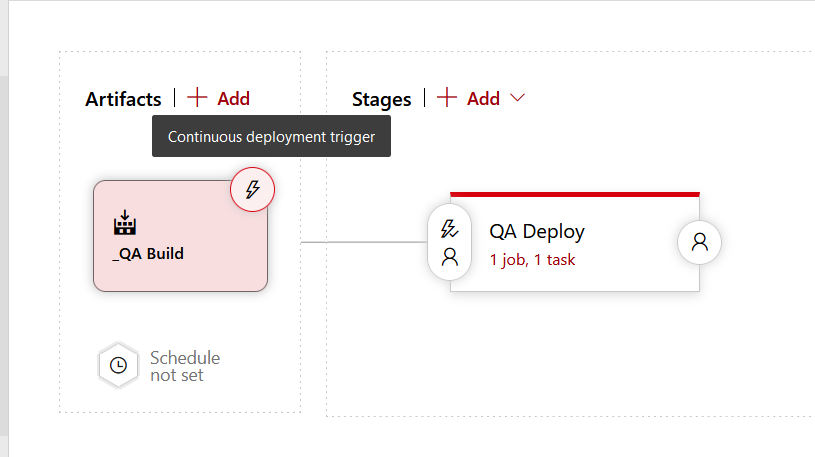
In the sidebar we just enable the trigger “Continuous Deployment Trigger”. We don’t need to use a branch or tag filter, since this is handled by the build pipeline task - this artifact will only be produced by pushes to the main branch.
Last we’ll set a trigger on the deploy task:
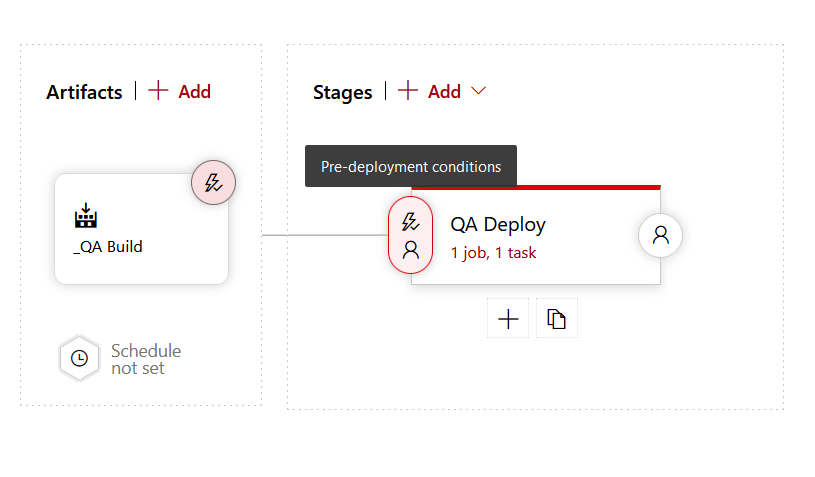
This is the trigger we’ll use to set up an approval flow on deploy - the settings should look like this:
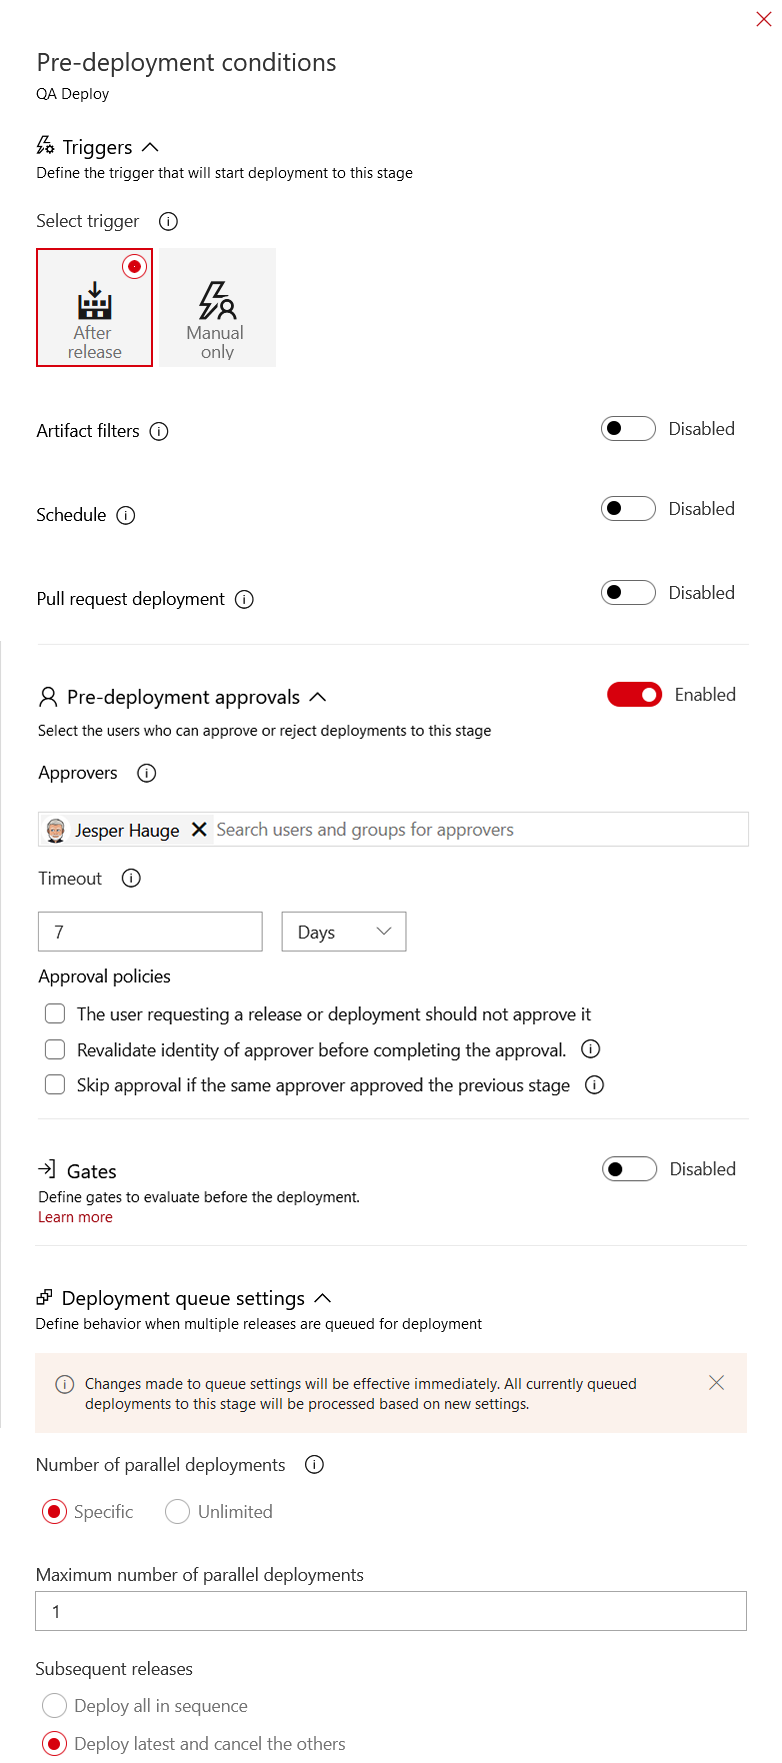
This setup contains following rules:
- It will start at deployment by creating a release but not executing the deploy after the release of the artifacts
- Pre-deployment approval is enabled, and Jesper Hauge is assigned as the person that can approve the deployment.
- If the release hasn’t been deployed after 7 days it will time out, meaning it cannot be approved anymore.
- Only 1 deployment is allowed to run
- If this release pipeline has queued deployment only the latest will be deployed, this could have profound impacts if the queued deployment we’re set to do DB schema updates or something like the so use with caution.
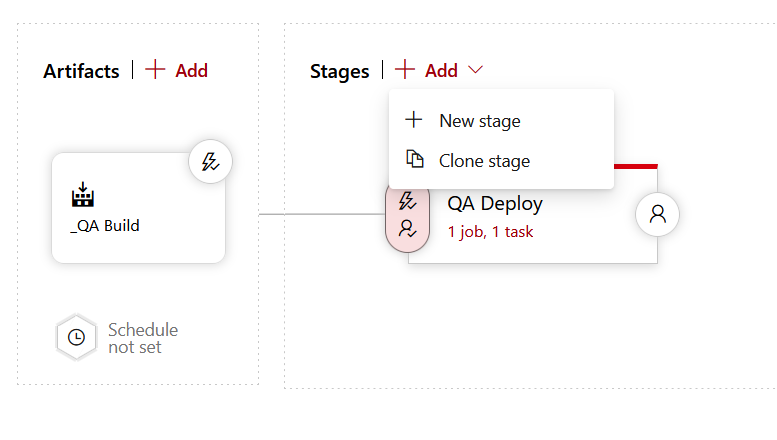
Last thing we need to do is to add a task to handle deployment slot swapping. Click the “Add” button in the stages area, and select the “Deploy a function app to Azure Functions with slot” as before:
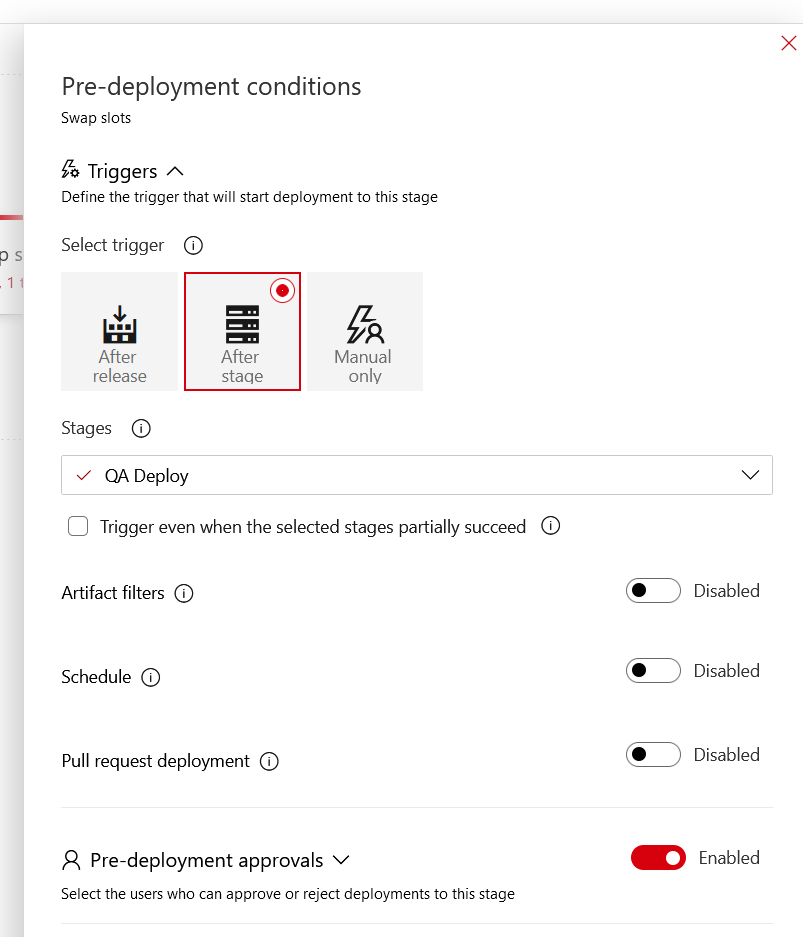
Set the stage trigger to be “After stage” and select the first stage as the trigger stage. Setting it up like this means the the swap stage doesn’t get created unless the deploy to QA stage gets approved. Add an approval to this stage as well, and set the approval timeout to the amount of time you want the QA stage to be able to live before it has to be deployed to production. You want this timeout to be as long as you need to be able to complete the QA process. If it times out you need to create a new release.
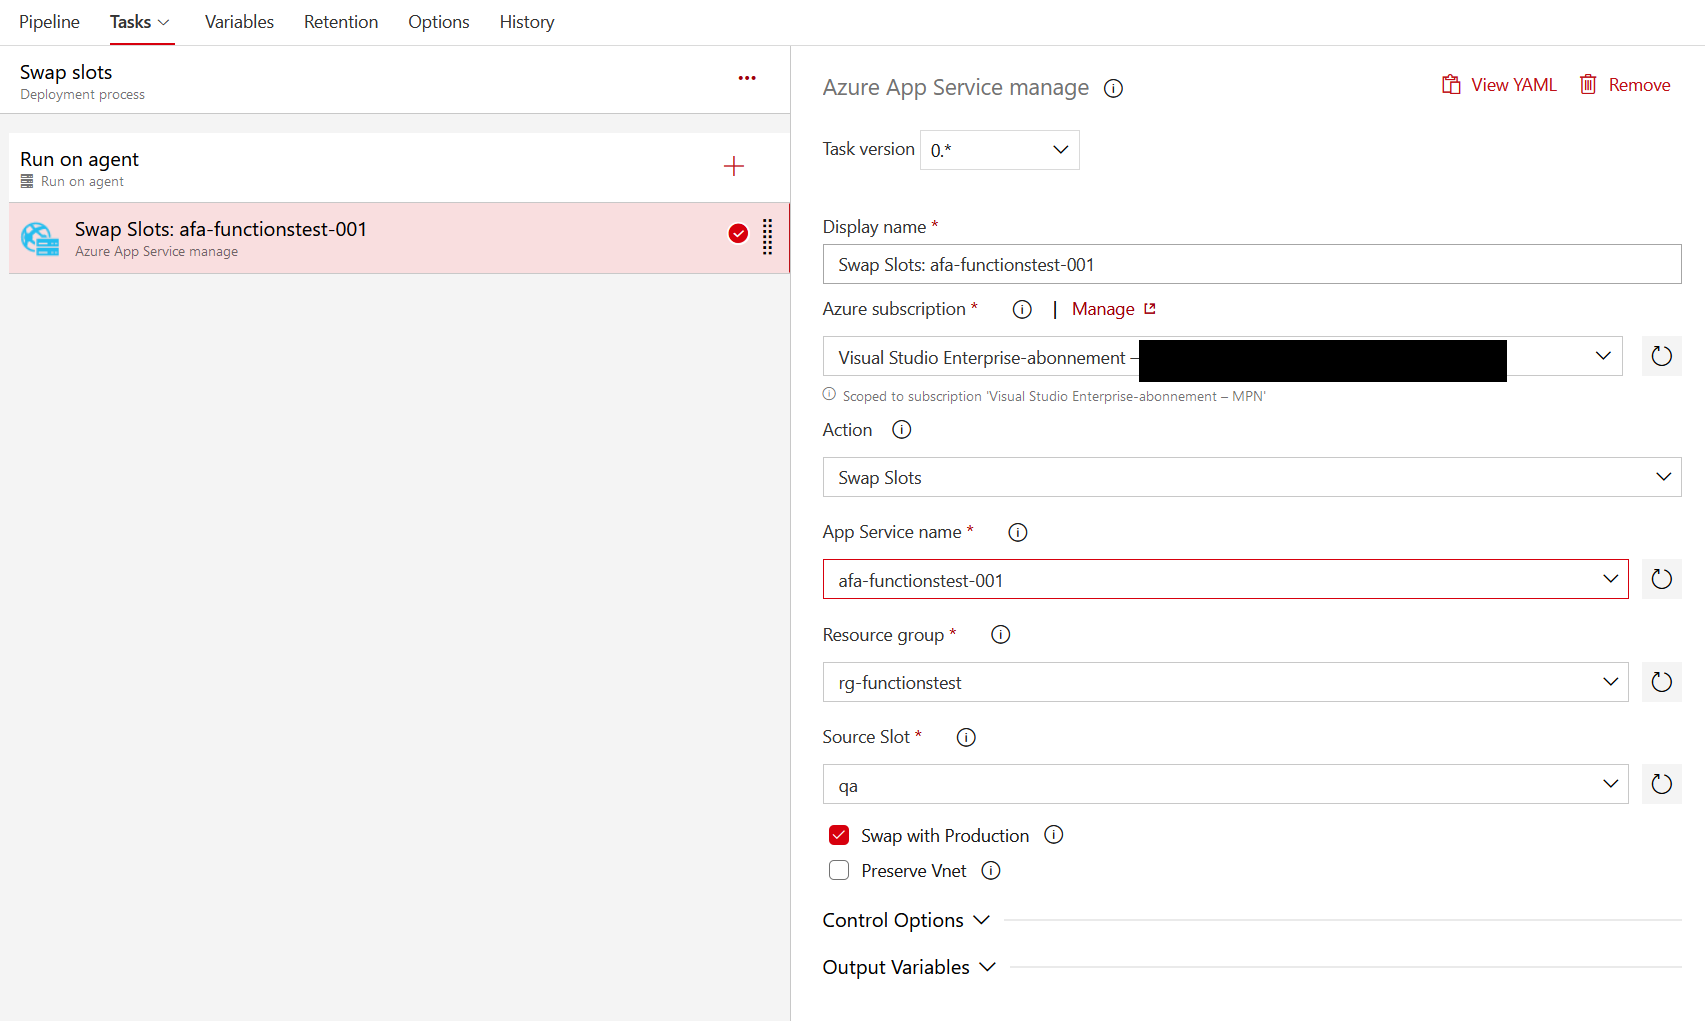
This time you delete the “Deploy Azure Function App” and keep the “Swap” task instead, set the settings to use
- Same Service account as before
- Action Swap slots
- Same resource group
- Check the “Swap with production” checkbox.
Finally click the pipeline name in the top, give the pipeline a fitting name like “Production release” and save the pipeline.
Now we should be able to kick off a deploy to QA by pushing a change to our main branch, and then just wait for the pipeline to kick in once the build has produced it’s artifact. This will create a new release - with a deploy task awaiting approval.
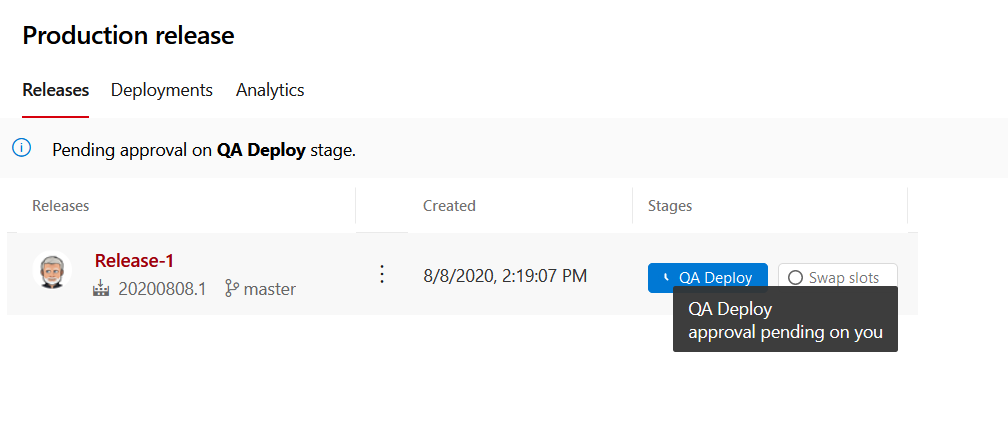
Clicking the stage that awaits approval, display a sidebar for approval (if you’re one of the persons allowed to approve the stage). In this sidebar you can type a comment, and optionally mark the stage to be carried out later at a specific time.
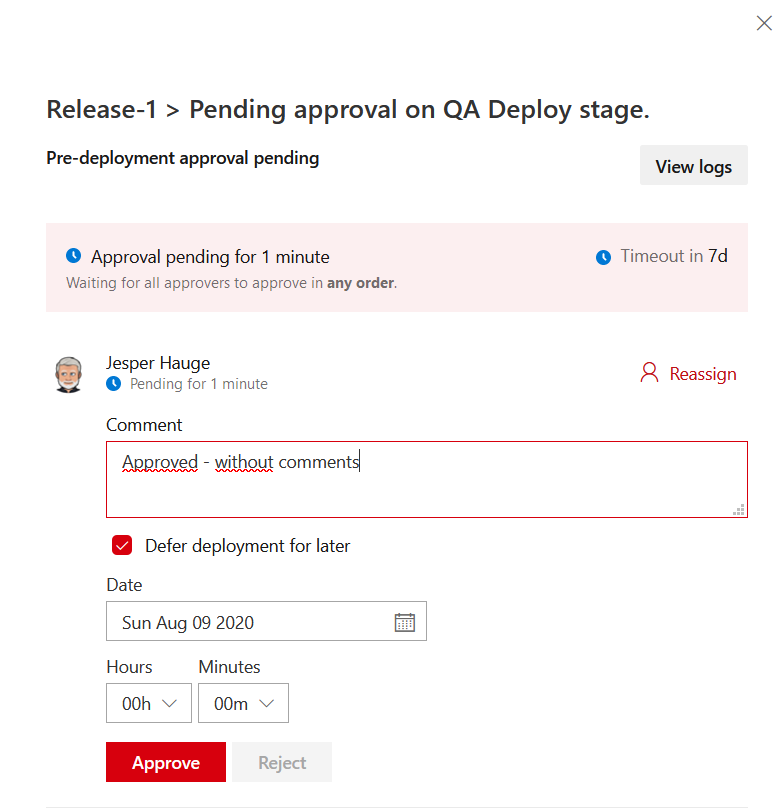
Once the stage has been approved and has finished running, we will be able to approve the slot swapping stage, using the same approach as when we’re approving the deploy stage.
Hotfixes
Last thing we need to cover is hotfixes. To me hotfixes are necessary when you discover a serious bug/security issue in production that needs to be fixed outside the normal QA/Swap to production workflow. This can happen if the main branch contains code in QA that is not ready for release yet, which means we need to fix something based on the commit the is running in production right now, and we need to get it into production without putting it in the main branch that is already “polluted” with some new code.
One way of handling this in the scenario we’ve built so far would be to create a separate build/deploy pipeline for hotfixes, that lets us move a separate hotfix branch directly into production without going through the current main branch and the QA environment. Obviously this is something we should only do in very special cases, and I would recommend that you have even more restricted access to approving the release of this pipeline, than in normal circumstances. The workflow for hotfixes will be:
- Determine the hash of the latest commit running in production right now.
- Create a hotfix branch from this commit, and do the necessary code changes on this branch
- Test the code fixes locally on production data
- Push the hotfix branch to the the central repository
- Approve deploying the hotfix directly into production.
- Merge the hotfix into the development and master branch, so that it is present in the code going into production next time.
- Delete the hotfix branch after next deploy to production.
To handle it we will have to:
- Create another yml-pipeline definition called “azure-pipelines-hotfix.md” that triggers on hotfix branches.
- Set up a build using this pipeline that produces a set of hotfix artifacts
- Create a release pipeline that pushes these artifacts directly into production
Hotfix build pipeline definition
We can use the existing production build pipeline as blueprint and change the trigger and the output names
trigger:
- hotfix/*

# Same variables and pool as production build

stages:
- stage: Build
  displayName: Build stage

  jobs:
  - job: Build
    displayName: Build

    steps:
    # Same build task as production build

    - task: ArchiveFiles@2
      displayName: 'Archive files'
      inputs:
        rootFolderOrFile: '$(System.DefaultWorkingDirectory)/publish_output'
        includeRootFolder: false
        archiveType: zip
        # I'll add '-hotfix' to the zip file name, to make it apparent for anybody downloading the zip
        archiveFile: '$(Build.ArtifactStagingDirectory)/$(Build.BuildId)-hotfix.zip'
        replaceExistingArchive: true

    - publish: '$(Build.ArtifactStagingDirectory)/$(Build.BuildId)-hotfix.zip'
      artifact: drop
Add this file to the repo, then add a build pipeline to the collection in the same way as before, pointing to this file.
Last create a release pipeline triggered by the artifact produced by this pipeline, and set it to publish directly to the production Function App - remember to add an approval flow only allowing most trusted team-members to push hotfixes directly into production.
In conclusion
That is it - a minimal but production ready build/deploy/release workflow setup for Azure Function Apps. Lots of room for improvements and specialization here - you could set up notification flows, multi-step approval flows, automated testing and a lot more. But almost everything you’d like to do can be added to the scaffold build so far.
Stay tuned for the next post about production ready Azure Functions App setups, which will be about App configuration and application secrets.
This blogpost is a part of a series of posts about Azure Function Apps in production. These are the posts and planned posts in the series so far.
- Creating a .NET Core based Azure Function App and runnning it locally
- Build / Deploy pipeline for Azure Functions App
- Handling configuration and application secrets
- Binding data in Azure Function Apps
- Debugging your Function App
- Versioning your Function App API
- Documenting your Function App API